


How to Create a Database With SQL
Every database management system has its way of creating a database. This short tutorial is aimed at creating, initializing and populating a database using RaimaDB. It covers the use of the rdm-sql tool to create a database via SQL statements in a script file and/or SQL statements entered directly through the command line tool.
This tutorial demonstrates basic database operations with the simplest of all databases, which we call a “Hello World” database, using the RaimaDB SDK. Raima has also created a sequence of executable demos that don’t require a preinstalled SDK. You may go directly to these demos, or continue with this tutorial. The demos start with a “Hello World” sample and graduate to ever-more complex demonstrations of SQL usage and the Raima programming APIs.
If you do not have the SDK for RaimaDB, you can download the free evaluation version here. The demos do not require any preinstalled Raima software, as all needed components are packaged with each demo and may be discarded when completed.
Creating a database via importing a script file
This section will show you how to define and create a script file. You will then use the RaimaDB tool rdm-sql to read and execute the statements, resulting in a new database.
Structure a script
Inside of a script file, you will define a series of SQL Statements, such as the SQL CREATE DATABASE statement, to execute to define and create your database including the tables and rows. The format will look similar to this.
					create database hello_world;
create table hello_table (Foo char(31));
commit;
Taking a look at the above SQL Statements, you can see that it starts by creating a database with the SQL Statement format “CREATE DATABASE {database_name}“. The next statement creates the table “hello_table” with F00 being the only column in the table. Be sure to save the file (called “hello_world.sdl” in this tutorial), then proceed to the next step. Note that SQL is not case sensitive.
Compile the script
RaimaDB has a tool for executing SQL statements, which is exactly what the file above is doing. It is executing the required statements to create a simple database. The name of this tool is rdm-sql. You will be using this tool through command line operations, which will be the same regardless of what platform you are on.
Step 1) Navigate to the location of where you want your database stored.
Step 2) Create and initialize the database.
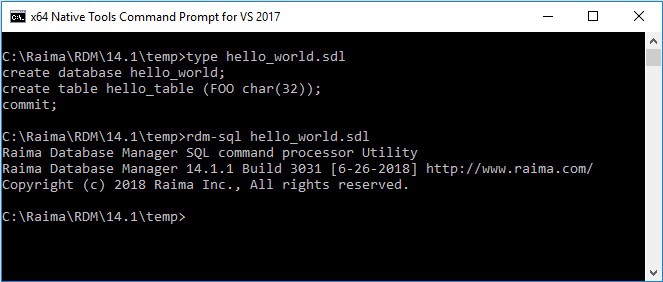
Run rdm-sql “name_sdl_file”.
Ex: rdm-sql hello_world.sdl
This will generate all of the necessary database files under a subdirectory called HELLO_WORLD.rdm/:
Alternate Method: Execute SQL Statements Directly Using the rdm-sql Tool
The rdm-sql tool can also be used to execute SQL statements directly via the command line interface to the tool.
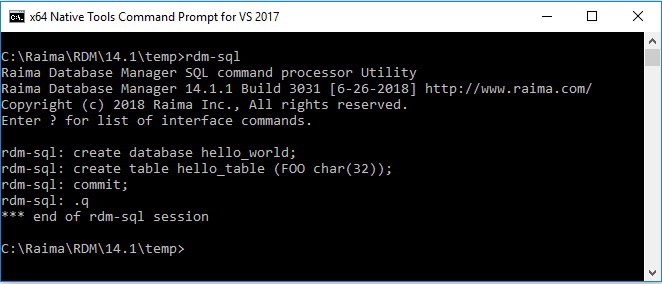
Simply run the following command on the command line to start up the tool : rdm-sql
This will bring up the interface.
Then key in the following statements. The firs two lines define the database, and the “commit;” causes the database to be physically created. The last line exits the tool.
					create database hello_world;
create table hello_table(Foo char(31));
commit;
.q
Populating Data in Your Database
Step 1) Create a row in the database.
To add rows to a database, use the SQL INSERT statement:
					insert into hello_table values ('Hello World');
commit;
The two statement above cause one new row to be inserted and then committed to the database. Until the commit, nothing will exist in the database files to be used at a later time.
Viewing the new row with the rdm-sql utility involves issuing a SQL SELECT statement:
select * from hello_table;
This asks for all columns of all rows. It is a trivial result set now, consisting of one row and one column containing the text “Hello World“.
Step 2) Insert and update rows.
Any additional rows are added to the existing ones. The SELECT statement will see uncommitted changes. Your database connection is able to view everything that has been added, deleted or changed prior to the commit of the transaction. It is at the commit that other users (in a multi-user configuration) can also see your connection’s changes, and as mentioned before, the commit makes your changes durable – safe on the disk.
The following statements insert new rows, look at the full contents, update a row, and view the contents once more before a final transaction commit:
					insert into hello_table values ('Hello USA');
insert into hello_table values ('Hello UK');
insert into hello_table values ('Hello Australia');
commit;
select * from hello_table;
update hello_table set Foo='Hello English speaking World' where Foo='Hello World';
select * from hello_table;
commit;
.q
This complete sequence in rdm-sql would look like this in a Windows command prompt:
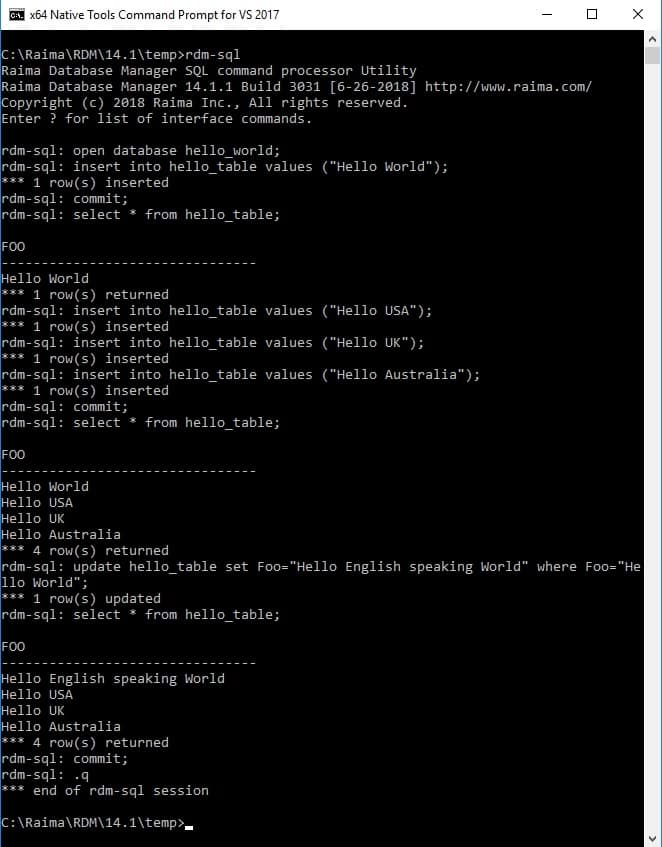
Note that there is no reason to exit rdm-sql between the database creation and database updates.
References
More information about SQL: MSDN SQL Create Database Reference.